Create Custom Attributes to gather information about your attendees upon registration!
Custom attributes are a great way to gather information & data from your attendees, upon registration. An example of a custom attribute could be:
'We'd love to send you a welcome T-shirt, please input your T-shirt size'.
From a drop down menu, delegates could then select between sizes S-XL.
To create a Custom attribute:
- Go into Registration (step 1) and select the Attributes tab.
- Within Attributes, you'll find a list of attributes which you can either enable or disable, depending on your requirements. These include: Country, Company, Job Title etc.
- Scroll to the bottom of the page & under Custom attributes, select create.
- Upon selecting create, work your way through each of the options available to you. Start by inputting the name of the attribute i.e. We'd love to send you a welcome T-shirt, please select your T-shirt size. Lastly, select save.
- Your newly created attribute will appear within the registration page for your attendee's to respond to accordingly.
Creating an 'Other' option for attendees
When creating custom attributes, you might want to enable attendees to input a response or feedback which is different to your pre-set options. An example of this could look like:
'We'd love to send you a welcome T-shirt, please select your T-shirt size'
An attendee could select from one of the pre-set options:
S
M
L
However, you might want to allow them to input an 'Other' option.
To create this:
Ensure that Other option is Enabled.
Other option label: This label signals that there are further options to choose from i.e. 'Something else' or 'Further information' or 'Another size'.
Other option text field label: Upon selecting the other option label, the input text will clarify the other options field i.e.
'Please specify your T-shirt requirements here'
'Provide further information about your experiences here'
'Leave your feedback & any comments here'
Creating branching questions for custom attributes
Branching questions can be used to customize the registration process for users and help them bypass irrelevant questions. An example of branching questions could be:
(Question): Do you need to book transport?
If (do you need to book transport?) is Yes
The next questions associated to this answer would be: When you do arrive?
If the answer was no/other, a branching question wouldn't be required within this workflow & instead the user would move onto the next set of question.
Please follow these rules to set up branching questions:
- There are two types of attributes required for branching questions:
Parent attribute: When creating a parent attribute you must ensure that this set as a single drop down. This is to ensure that a single condition answer is set which the child attribute will branch off from.
Child attribute: This will attach to the parent attribute & will branch off the primary selected (single drop down) response. - Please be advised that branching questions only extend to one level meaning that after the child attribute is answered, branching questions can't be attached to the child.
- Attributes: Where you set up the attributes.
- Tickets: Where you manage the branching workflow.
Please follow these steps to set up the branching attributes workflow:
- To manage the set up of the attributes go into the 'attributes' tab & create both the parent & the child attributes. Remember that the parent must be a single select drop down & the child can be set to any, including open text.
Also ensure that the status is marked as 'enabled' for both.
Please see examples of parent & child attributes below:
Parent:
Child:

2. To manage the workflow, now go into the registration ticket where you want the branching workflow to feature.
3. Within the ticket you'll find a 'Question flow' tab. This is where you manage the branching of questions from parent - child.
- Select Add Attribute: Please select the parent attribute.
- Now select Add rule. Upon adding the rule, select the single drop down answers which will branch onto the child question.

- Within Attribute, now select the branching child attribute & then select save:

4. Still within the ticket, select the 'Custom attributes' tab and ensure that the attributes are also enabled from here. If they aren't, they won't be visibly available within the live registration.
You've now created your branching questions!
Grouped Attributes
To develop this further develop the branching questions you might want to create grouped answers. To achieve this, please follow these rules:
1. As per the above ensure that you've created a single parent attribute but instead of creating one child attribute you would set up several of them.
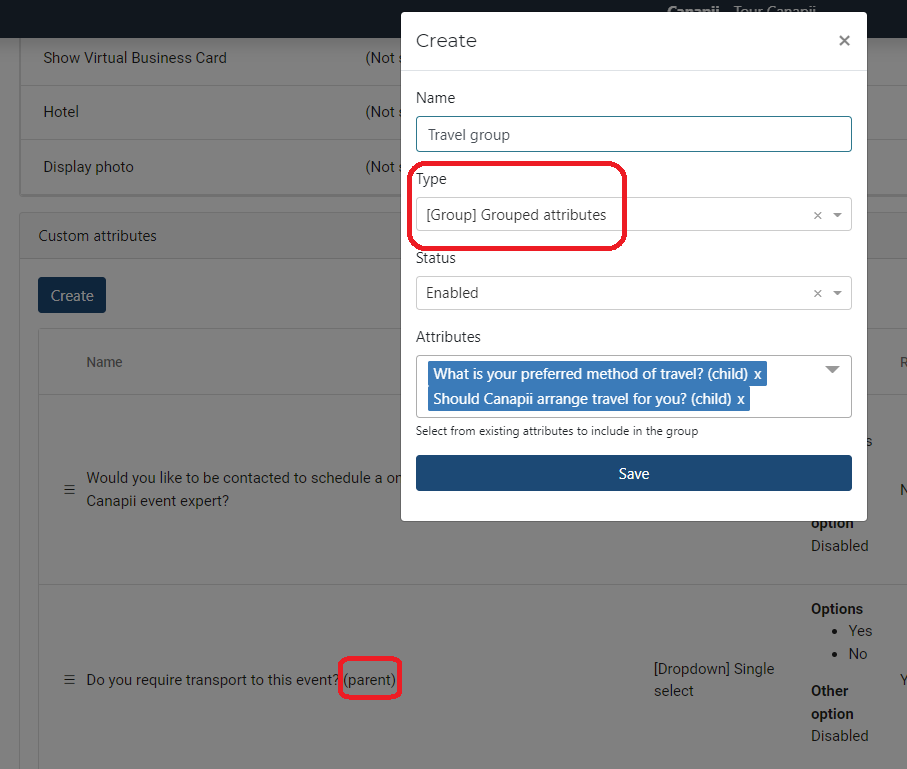
2. Once the attributes have been created, you'll want to group them so under Type, select Grouped attributes.
Under Attributes, only pull through the child attributes & save. As per the example below, you will see that the parent attribute hasn't been selected here.

3. Now as before:
- Select the ticket.
- Select the Question flow tab.
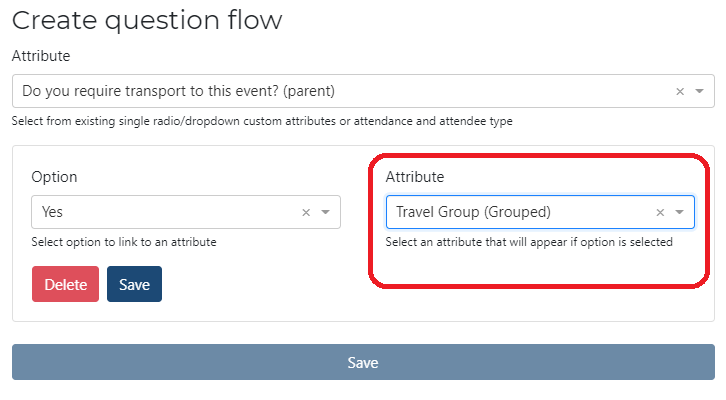
- Add attribute.
- Select the parent attribute.
- Add rule.
- Select the single select answer which will branch to the child attribute.
- Now select the grouped attributes (instead of the single child attribute).
- Select save.
- Within the ticket, select the Attributes tab and ensure that each are enabled.
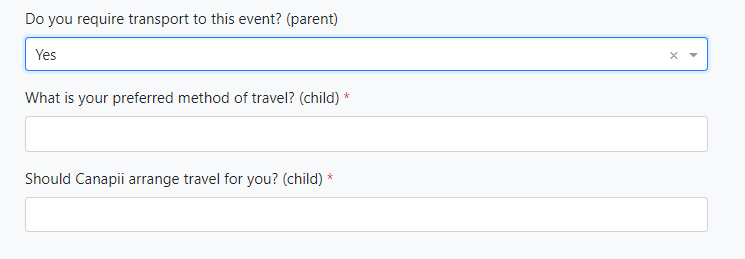
4. Within the registration, the grouped attributes will look like this:
Can I change an attendee's answer (for a custom attribute), after they've registered?
If you're required to make amendments to an attendee's response to a custom attribute, you can do this by searching for their name (within the Attendees tab - Step 1) and clicking in to their profile.
Once within their profile, scroll to the bottom and select Update additional information.
The attribute will pop up on screen & enable you to make the amendment.
Or
You can enable a setting which allows delegates to update their own responses to a custom attribute.
To achieve this, select update within the attribute that you wish to make accessible.
When you reach Make editable within profile page: select Enable.
Once enabled, your delegates will find their personal profile within the top right hand corner of an event. Select update profile, scroll to the bottom of the page until they find Additional Information and here they can update their details accordingly.

