The Campaigns feature will allow you to send emails out to a pre-arranged mailing list!
The campaigns tool allows event organizers to send emails out to individual contacts or a pre-created mailing list. The campaigns tool allows you to send these communications from your preferred sender email address.
To add your sender email, click Senders and then Create, and input the email address that you'd like to use. This will send a verification code to the email inbox that you chose. Go to the email inbox of your sender email and copy the code (if you don't see it, you may need to check your spam folder), then input the code into the verification field and submit.
After you have successfully verified your sender email, you will see DKIM tokens populated which you will need to add to your DNS server. You will then receive an email to verify what you have added.

Once done, all verification should me marked YES.
The sender email will need to be a real email address that can send and receive messages - you'll be connecting your email to the campaign tool, rather than creating a new one.
There is a "Configure reputation" input which will allow you to set the maximum number and rate of bounced emails or emails marked "spam" by the recipient, which helps you to protect the reputation of your sender email.
You can add emails to a block list if you'd like to exclude them from your email campaigns in the Suppression list section.
Create a campaign
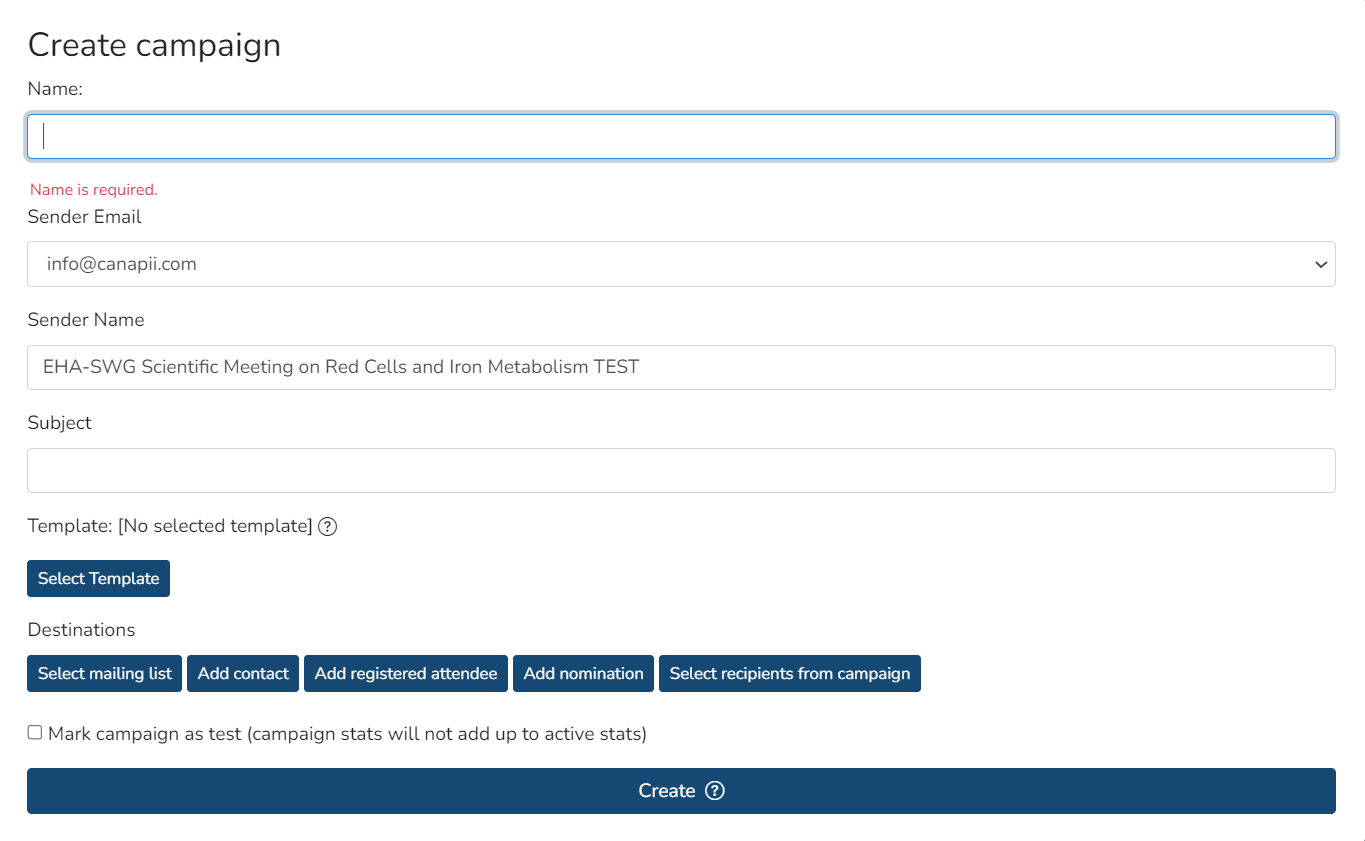
Click Create in the Campaigns page - an edit modal will appear with a workflow for creating your campaign.
1. Name your Campaign.
2. Choose a Sender Email from your list of verified email addresses.
3. Set the Sender Name.
4. Add the Subject.
5. Select Template.
6. Set your Destinations. This where you can add the mailing list or select the recipients of the campaign.
Tip: If you are creating a test campaign you can opt to Mark campaign as test so the stats for your test campaign will not affect your campaign metrics.
7. Click on Create.
Set email destinations
When setting up the campaign's email destinations you will have the options to:
1. Select a pre-created mailing list.
2. Add individual contacts.
3. Choose from your registered attendees.
4. Ability to use a nomination system to filter contacts.
5. Select recipients from a previous campaign.

After you have created your campaign, you can click on the campaign name from the campaign list for further setup of the newly created campaign.
You can opt to:
1. Send test email.
2. Update campaign details.
3. Delete the campaign.
4. Duplicate the campaign.
5. Publish or set a schedule for the campaign.

You will also see different tabs such as:
1. Details where you can view the campaign details.
2. Destinations where you can export the email and mailing list destinations.
3. Delivery Status where you can view the delivery status of the campaign to each recipient.
4. Links tab to view clicks on any links added to your campaign.

Templates
You can customize your emails within the Campaign Tool by creating your content under the Template tab.

Simply select your desired template and edit the body of the email as you wish.
The logo and email banner on campaign tool automatically updates the template with the logo and email banner uploaded in General Settings.
Using placeholder codes to personalize your emails:
You can use the following markdown codes in your welcome emails to pull relative information from both your attendees' profile and event information:
| Placeholder code | Result |
| {event} | Pulls the full name of the event |
| {firstname} | Pulls the first name of the user |
| {lastname} | Pulls the last name of the user |
| {email} | Pulls the user's email address |
| {attendeeQR} | Pulls the attendee QR code |
|
{arrival_time} {departing_time} |
Arrival and departure dates for Hotels |
|
{hotel} |
Hotel name |
|
{roomType} |
Hotel room type |
|
{checkinDate} |
Hotel check-in date |
|
{checkoutDate} |
Hotel check-out date |
|
{confirmationNumber} |
Hotel confirmation number |
|
{hotelRemarks} |
Hotel notes or remarks |
Attendee QR code within Campaigns
When your event mode is set to 'In-person' you'll find within the Campaign tool that there is the option to add a QR code as a placeholder. Simply type {attendeeQR}. This enables event organizers to send over the attendee's QR code as part of their emails!
For example:

