Canapii Knowledge Base

Getting Started

7
  • How to create an event with Canapii
  • What is the Master Console?
  • Virtual vs In-person event settings
  • Using Google, Facebook, Apple or LinkedIn to access Canapii
  • Why Hybrid? In-person and virtual event management
  • Organizational Analytics
  • Event Mobile App

Design

12
  • General Settings
    • How to Duplicate Events
    • How to Enable Event Features & Networking
    • Menu Bar Customization
    • Reporting Settings
    • How to change an Events Settings
    • Event mode & attendance
    • How to view your event page
    • Branding and customizing your event
    • Banners and page descriptions
  • Microsite
    • Building microsites
  • Welcome Video
    • Adding a welcome video to your event
  • Tabbed Contents
    • Tabbed Contents

People

24
  • Registration
    • Creating custom registration fields
    • Proxy registration
    • Custom welcome emails & registration questions
    • Setting a default language as part of event ticketing
    • Creating event tickets or attendee types first?
    • Sharing ticket links with attendees
    • Invite codes
    • Show personalized data across your event platform
    • Do I need to create both tickets and attendee types?
    • Custom Attributes
    • How to build and edit the registration experience
    • What are tickets and how to create one?
    • How to restrict event tickets to certain emails or domains
  • Attendees
    • Understanding more about attendee activity
    • Where to find registered attendees
    • How to find specific attendees or groups
    • Importing attendees into an event
    • Attendee types
  • RSVP
    • RSVP Management
  • Nominations
    • Using a ‘nominations’ approach for attendee registration
  • Admins
    • Is there an admin limit for events?
    • Adding admins to an event
    • Set as an admin but can’t ‘view’ the event?
    • Managing tech support for your event

Communications

6
  • Campaigns
    • How to verify your email domain or DKIM
    • Importing contacts into the campaign tool
    • How to use the Campaign Tool
  • Message Center
    • Message center
  • Notifications
    • Notifications
  • FAQs
    • Customizing your events FAQ page

Content

44
  • Sessions
    • Moderating the Q&A and Comments tabs during live sessions
    • Making a session private
    • Creating tags and tracks for your sessions
    • Live transcription & closed captions (live breakout sessions)
    • Sessions and How to Create Them
    • Social media sharing for sessions
    • How to identify watched sessions
    • Breakout rooms: How to add, manage, open and close
    • Assigning live breakout roles and explaining the different permissions: Host, Speaker and Viewer
    • Understanding attendee engagement between converted live breakout sessions – VOD sessions
    • How to join a session or meeting in Canapii
    • Preview videos for sessions
    • Highlighting sessions on your event homepage
    • Add downloadable resources & attachments within session page
    • Session reminders
    • Multi-language video options
    • What is Simulive?
    • How to enable share screen permissions on live breakout session when using Mac
    • Ensuring that session speakers are set as ‘session admins’
    • How to add date and time information to session tiles
    • Default, highlight & secondary banners
    • Session announcements
    • How to use Canapii’s video conferencing tool
    • VOD, Live streams, Live-breakouts and Simulive content types
    • Livestreaming
    • What happens when a session page is ‘enabled’?
    • What is the live breakout, whiteboard feature?
    • How to record breakout sessions
    • Guidelines for uploading session tiles
    • Canapii’s greenroom guide
    • ‘Raising hands’ during live breakout sessions
    • What links are supported in the ‘others’ content type?
    • How to upload an On-Demand video
    • Live breakouts – When can speakers and participants join a session?
    • The difference between Canapii conferencing, Zoom and Custom in Live Breakout Sessions
    • Adding a live badge to sessions
    • Understanding how many attendees are viewing live sessions
    • Setting default session settings & editing individual session details
  • Speakers
    • Creating and Managing Speaker Profiles
    • A speakers guide to using Canapii
  • Playlists
    • Creating and Managing Playlists
  • Polls
    • Creating and Managing Polls
  • Abstract
    • Abstract
  • Projects
    • How to Setup Projects

Networking

18
  • Chat
    • How to create a chat group as an organizer
    • Event interactive bar capabilities
    • Homepage chat
    • Utilizing the chat bar during an event
    • What is a chat group?
    • How organizers can contact & network with attendees
  • Meetings
    • Meeting options for attendees
    • How to restrict who can meet with who
    • Audio & visual trouble shooting for meetings
    • Meeting and chat notifications
    • How long are meetings?
    • Matchmaking
    • Understanding pre-defined meeting times
    • How to send out meeting reminders
    • Requesting and managing meetings on Canapii
    • How organizers can edit and view meetings
    • What is a meeting?
    • How to create meeting timeslots within the console

Sponsors

11
  • Creating dedicated sponsor zone representatives
  • Sponsor zone logos, banners and tags
  • What can sponsor admins do on their sponsor page?
  • Understanding the sponsor zone analytics
  • Sponsor zones
  • Building your sponsor zone
  • How to tier event sponsors
  • How to join a session from the Sponsor Zone
  • In-person events: Sponsor leads and Invite codes
  • Adding chat rooms to sponsor zones
  • How to add sponsors to an event

Onsite

11
  • What are Canapii’s in-person capabilities?
  • Badge
    • Badges
  • On-site Control Panel
    • In-person events: QR codes & scanning feature
    • In-person events: Meetings and Sessions
    • On-site Control Panel
  • Fligths
    • Approving and Declining Flights
    • How to manage flight information for in-person events
  • Floorplan
    • Floorplan
  • Hotel
    • How to manage hotels reservations in Canapii
  • Locations
    • In-person Events: Meeting & session locations
  • Venue
    • Venue

Community

4
  • Certification
    • Creating Certification
  • Gallery
    • The Community Gallery
  • Gamification
    • Gamification Setup
    • What is gamification?

Tools

19
  • Domain
    • How to get a custom web domain for an event
  • Integration
    • How does the Social Wall work?
    • Webhooks
    • Slack and Microsoft Teams Integration
    • Stripe
    • Cisco Webex Integration
    • Stripe integration – Test & live keys
    • Green Terp Integration
    • Snapbar & Pixiweb Integration
    • How to integrate Zoom into your platform
    • How to integrate a HyHyve space into your event
    • Interprefy
    • How to integrate Marketo with Canapii
    • Custom registration portal integration
  • Translations
    • Translating an event
    • Translated closed captions
    • Turning on translated closed captions during sessions
    • Translating comments & adjusting time zones
    • How to apply actions to comments & questions

Analytics

2
  • What event analytics are available?
  • Event analytics

Viewing your event

3
  • Event View: How to change Time zone
  • How to see the changes you’ve made to an event
  • Event agenda, my agenda & home agenda

FAQs

16
  • About Canapii
    • Frequently asked questions
    • Canapii’s Terms and Conditions
    • Canapii’s privacy policy
  • Sessions
    • FAQs about sessions
    • Can a live breakout or webinar meeting timeout if nobody joins?
    • Why am I unable to see sessions on the platform homepage?
  • Networking
    • FAQs about networking
  • Sponsors
    • FAQs about sponsors
  • Registration
    • FAQs about registration
  • Other FAQs
    • Can my team receive help emails from our attendees?
    • Canapii Support: Help and FAQ email
  • Pricing
    • Can I run a free trial using Canapii?
    • How should I determine the best package for my event requirements?
    • Is there a minimum term I must commit to for my plan?
    • Is there a limit to the number of events I can run in my plan package?
    • Can I upgrade or cancel my plan at any time?

Troubleshooting

10
  • How to reset your password
  • Trouble receiving verification code
  • Audio and video settings for meetings and live breakout sessions
  • Logging into Canapii without a password
  • Troubleshooting tips for display errors
  • How to adjust video quality
  • “Event not found” message
  • White screens & 404 error messages
  • Trouble receiving MFA sms code
  • Where to find technical support pre, live & post event

Pricing

5
  • Enterprise plan
  • Essential plan
  • Trial plan
  • Training Sessions for non-Enterprise plans
  • Professional plan
View Categories
  • Home
  • Content
  • Breakout rooms: How to add, manage, open and close

Breakout rooms: How to add, manage, open and close

Canapii
Updated on March 24, 2026

3 min read

Table of Contents #

Adding breakout rooms to a session

Managing breakout rooms

Managing breakout room details

Managing attendees assigned in breakout rooms

How to open breakout rooms

How to close breakout rooms

Adding breakout rooms to a session #

Navigate to your session and select the enable breakout rooms button at the top.

Once you select enable breakout rooms, a dialogue box will appear that will give you the ability to determine the total number of breakout rooms and whether attendees are assigned automatically or manually to their respected rooms. Additionally, as an admin you’re also able to control whether there will be a maximum capacity for the breakout rooms.

Once you have enabled breakout rooms for a specific session,  scroll to the bottom of the page where you will see a breakout rooms tab. Clicking into this tab will give you an overview of your session’s current breakout rooms including the following:

    • assigning breakout room hosts
    • broadcasting a message to all participants
    • filtering and assigning attendees to their breakout rooms
    • renaming, deleting and adding additional breakout rooms

Managing your breakout rooms #

Assigning users to your breakout rooms #

Use the panel on the left side of the breakout rooms tab for a quick view of users and assigning them to breakout rooms by:

  • All Attendees
  • Attendee Type
  • Search Field
  • Watching Now (users who are currently watching the session)
  • Unassigned (users who are currently unassigned to a breakout room)

When you are ready to assign users simply check the box next to their name in the list and click assign to manually choose which room they are assigned to OR us the random assign option to spread the selected users across all rooms.

Managing breakout room details #

 The right section of the breakout rooms tab shows the list of the created breakout rooms. You can rename these rooms, send a broadcast message to all attendees, manage assigned attendees, and export all breakout room analytics

Once your breakout rooms are created there will be a few icons that appear to the right of the breakout room title:

  • This icon will take you to the specific breakout room’s settings page (similar to the settings page of the primary session). This is where you can manage this breakout room’s settings such as privacy, status, meeting mode, interactive bar defaults and more.
  • This icon will add the individual breakout room’s URL to your clipboard so that you can quickly share links to these rooms for external users or support teams to quickly join.
  • This icon will allow you to rename the breakout room.
  • This icon will delete the breakout room.

Managing attendees once they are assigned to breakout rooms. #

As you assign users to their rooms you will see their name appear beneath each breakout room. Next to each name you will see a few icons that you can use to manage these attendees:

  • This toggle will quickly assign the user as host of their room (giving them the ability to share their screen and manage other attendees etc.
  • This button will allow you to quickly move the user to another breakout room
  • This icon will remove them from the breakout rooms and take them back to the primary session.
Note:

Any user who is not assigned to a breakout room will stay in the primary session. 

Opening your breakout rooms #

Opening your breakout rooms will automatically push users to their assigned rooms. An admin will need to initiate this from the Console side of your event platform.

You have three different options when opening rooms, you can select the open all rooms button to quickly push all users to their rooms. Or you can click on the drop down of that same button to select open for hosts. Opening for hosts will only pull in users that are toggled as hosts in their rooms. This is a great way to let hosts get set up prior to others joining.
Lastly, If you want to open individual breakouts you can do this by selecting the individual breakout room(s) and from the Actions dropdown, select open rooms. A pop up will ask whether you want to open these specific breakout rooms, accept & now your attendees will be pushed into their assigned rooms.

Once breakout rooms are open #

Once you have opened your rooms, attendees names will be highlighted in green when they are on the breakout room page, giving you a quick overview of who has been moved and is actively in the breakout room.

You can also broadcast a message to all rooms at the same time.

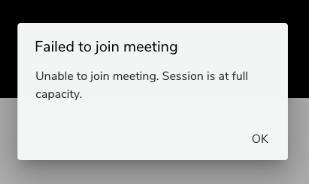
If you you have set a maximum capacity for the breakout rooms, any attendees which try entering a full room will find the following notification: 

Closing breakout rooms #

When you are ready to close all rooms simple select the red close all rooms button. This will start a 30 second count down clock that will show in each room alerting users that the breakout rooms will be closing shortly. You can also force close all rooms now to instantly pull users back to the primary session.

Note:

You cannot close or broadcast messages to individual rooms separately, all rooms will receive the message and close at the same time.

Table of Contents
  • Table of Contents
  • Adding breakout rooms to a session
  • Managing your breakout rooms
    • Assigning users to your breakout rooms
    • Managing breakout room details
    • Managing attendees once they are assigned to breakout rooms.
    • Opening your breakout rooms
    • Once breakout rooms are open
    • Closing breakout rooms

Share This Article :

  • Facebook
  • X
  • LinkedIn
  • Pinterest

Was it helpful ?

  • Happy
  • Normal
  • Sad
Canapii

The event operations platform for conferences, exhibitions, and hybrid events.

info@canapii.com +44 118 228 1385

Product

  • Event platform
  • Badge printing
  • AI features
  • Integrations

Solutions

  • In-person events
  • Hybrid events
  • Conferences
  • Exhibitions

Resources

  • Blog
  • Case studies
  • Knowledge base
  • Product updates

Company

  • About us
  • Why Canapii
  • Careers
  • Pricing
  • Contact us
© 2026 Canapii. All rights reserved.
Privacy policy Terms & conditions