Canapii Knowledge Base

Getting Started

7
  • How to create an event with Canapii
  • What is the Master Console?
  • Virtual vs In-person event settings
  • Using Google, Facebook, Apple or LinkedIn to access Canapii
  • Why Hybrid? In-person and virtual event management
  • Organizational Analytics
  • Event Mobile App

Design

12
  • General Settings
    • How to Duplicate Events
    • How to Enable Event Features & Networking
    • Menu Bar Customization
    • Reporting Settings
    • How to change an Events Settings
    • Event mode & attendance
    • How to view your event page
    • Branding and customizing your event
    • Banners and page descriptions
  • Microsite
    • Building microsites
  • Welcome Video
    • Adding a welcome video to your event
  • Tabbed Contents
    • Tabbed Contents

People

24
  • Registration
    • Creating custom registration fields
    • Proxy registration
    • Custom welcome emails & registration questions
    • Setting a default language as part of event ticketing
    • Creating event tickets or attendee types first?
    • Sharing ticket links with attendees
    • Invite codes
    • Show personalized data across your event platform
    • Do I need to create both tickets and attendee types?
    • Custom Attributes
    • How to build and edit the registration experience
    • What are tickets and how to create one?
    • How to restrict event tickets to certain emails or domains
  • Attendees
    • Understanding more about attendee activity
    • Where to find registered attendees
    • How to find specific attendees or groups
    • Importing attendees into an event
    • Attendee types
  • RSVP
    • RSVP Management
  • Nominations
    • Using a ‘nominations’ approach for attendee registration
  • Admins
    • Is there an admin limit for events?
    • Adding admins to an event
    • Set as an admin but can’t ‘view’ the event?
    • Managing tech support for your event

Communications

6
  • Campaigns
    • How to verify your email domain or DKIM
    • Importing contacts into the campaign tool
    • How to use the Campaign Tool
  • Message Center
    • Message center
  • Notifications
    • Notifications
  • FAQs
    • Customizing your events FAQ page

Content

44
  • Sessions
    • Moderating the Q&A and Comments tabs during live sessions
    • Making a session private
    • Creating tags and tracks for your sessions
    • Live transcription & closed captions (live breakout sessions)
    • Sessions and How to Create Them
    • Social media sharing for sessions
    • How to identify watched sessions
    • Breakout rooms: How to add, manage, open and close
    • Assigning live breakout roles and explaining the different permissions: Host, Speaker and Viewer
    • Understanding attendee engagement between converted live breakout sessions – VOD sessions
    • How to join a session or meeting in Canapii
    • Preview videos for sessions
    • Highlighting sessions on your event homepage
    • Add downloadable resources & attachments within session page
    • Session reminders
    • Multi-language video options
    • What is Simulive?
    • How to enable share screen permissions on live breakout session when using Mac
    • Ensuring that session speakers are set as ‘session admins’
    • How to add date and time information to session tiles
    • Default, highlight & secondary banners
    • Session announcements
    • How to use Canapii’s video conferencing tool
    • VOD, Live streams, Live-breakouts and Simulive content types
    • Livestreaming
    • What happens when a session page is ‘enabled’?
    • What is the live breakout, whiteboard feature?
    • How to record breakout sessions
    • Guidelines for uploading session tiles
    • Canapii’s greenroom guide
    • ‘Raising hands’ during live breakout sessions
    • What links are supported in the ‘others’ content type?
    • How to upload an On-Demand video
    • Live breakouts – When can speakers and participants join a session?
    • The difference between Canapii conferencing, Zoom and Custom in Live Breakout Sessions
    • Adding a live badge to sessions
    • Understanding how many attendees are viewing live sessions
    • Setting default session settings & editing individual session details
  • Speakers
    • Creating and Managing Speaker Profiles
    • A speakers guide to using Canapii
  • Playlists
    • Creating and Managing Playlists
  • Polls
    • Creating and Managing Polls
  • Abstract
    • Abstract
  • Projects
    • How to Setup Projects

Networking

18
  • Chat
    • How to create a chat group as an organizer
    • Event interactive bar capabilities
    • Homepage chat
    • Utilizing the chat bar during an event
    • What is a chat group?
    • How organizers can contact & network with attendees
  • Meetings
    • Meeting options for attendees
    • How to restrict who can meet with who
    • Audio & visual trouble shooting for meetings
    • Meeting and chat notifications
    • How long are meetings?
    • Matchmaking
    • Understanding pre-defined meeting times
    • How to send out meeting reminders
    • Requesting and managing meetings on Canapii
    • How organizers can edit and view meetings
    • What is a meeting?
    • How to create meeting timeslots within the console

Sponsors

11
  • Creating dedicated sponsor zone representatives
  • Sponsor zone logos, banners and tags
  • What can sponsor admins do on their sponsor page?
  • Understanding the sponsor zone analytics
  • Sponsor zones
  • Building your sponsor zone
  • How to tier event sponsors
  • How to join a session from the Sponsor Zone
  • In-person events: Sponsor leads and Invite codes
  • Adding chat rooms to sponsor zones
  • How to add sponsors to an event

Onsite

11
  • What are Canapii’s in-person capabilities?
  • Badge
    • Badges
  • On-site Control Panel
    • In-person events: QR codes & scanning feature
    • In-person events: Meetings and Sessions
    • On-site Control Panel
  • Fligths
    • Approving and Declining Flights
    • How to manage flight information for in-person events
  • Floorplan
    • Floorplan
  • Hotel
    • How to manage hotels reservations in Canapii
  • Locations
    • In-person Events: Meeting & session locations
  • Venue
    • Venue

Community

4
  • Certification
    • Creating Certification
  • Gallery
    • The Community Gallery
  • Gamification
    • Gamification Setup
    • What is gamification?

Tools

19
  • Domain
    • How to get a custom web domain for an event
  • Integration
    • How does the Social Wall work?
    • Webhooks
    • Slack and Microsoft Teams Integration
    • Stripe
    • Cisco Webex Integration
    • Stripe integration – Test & live keys
    • Green Terp Integration
    • Snapbar & Pixiweb Integration
    • How to integrate Zoom into your platform
    • How to integrate a HyHyve space into your event
    • Interprefy
    • How to integrate Marketo with Canapii
    • Custom registration portal integration
  • Translations
    • Translating an event
    • Translated closed captions
    • Turning on translated closed captions during sessions
    • Translating comments & adjusting time zones
    • How to apply actions to comments & questions

Analytics

2
  • What event analytics are available?
  • Event analytics

Viewing your event

3
  • Event View: How to change Time zone
  • How to see the changes you’ve made to an event
  • Event agenda, my agenda & home agenda

FAQs

16
  • About Canapii
    • Frequently asked questions
    • Canapii’s Terms and Conditions
    • Canapii’s privacy policy
  • Sessions
    • FAQs about sessions
    • Can a live breakout or webinar meeting timeout if nobody joins?
    • Why am I unable to see sessions on the platform homepage?
  • Networking
    • FAQs about networking
  • Sponsors
    • FAQs about sponsors
  • Registration
    • FAQs about registration
  • Other FAQs
    • Can my team receive help emails from our attendees?
    • Canapii Support: Help and FAQ email
  • Pricing
    • Can I run a free trial using Canapii?
    • How should I determine the best package for my event requirements?
    • Is there a minimum term I must commit to for my plan?
    • Is there a limit to the number of events I can run in my plan package?
    • Can I upgrade or cancel my plan at any time?

Troubleshooting

10
  • How to reset your password
  • Trouble receiving verification code
  • Audio and video settings for meetings and live breakout sessions
  • Logging into Canapii without a password
  • Troubleshooting tips for display errors
  • How to adjust video quality
  • “Event not found” message
  • White screens & 404 error messages
  • Trouble receiving MFA sms code
  • Where to find technical support pre, live & post event

Pricing

5
  • Enterprise plan
  • Essential plan
  • Trial plan
  • Training Sessions for non-Enterprise plans
  • Professional plan
View Categories
  • Home
  • People
  • Custom Attributes

Custom Attributes

Canapii
Updated on March 24, 2026

4 min read

Custom attributes are a great way to gather information & data from your attendees, upon registration. An example of a custom attribute could be:

‘We’d love to send you a welcome T-shirt, please input your T-shirt size‘.

From a drop down menu, delegates could then select between sizes S-XL.

To create a Custom attribute:

  • Go into Registration (step 1) and select the Attributes tab.
  • Within Attributes, you’ll find a list of attributes which you can either enable or disable, depending on your requirements. These include: Country, Company, Job Title etc. 
  • Scroll to the bottom of the page & under Custom attributes, select create. 
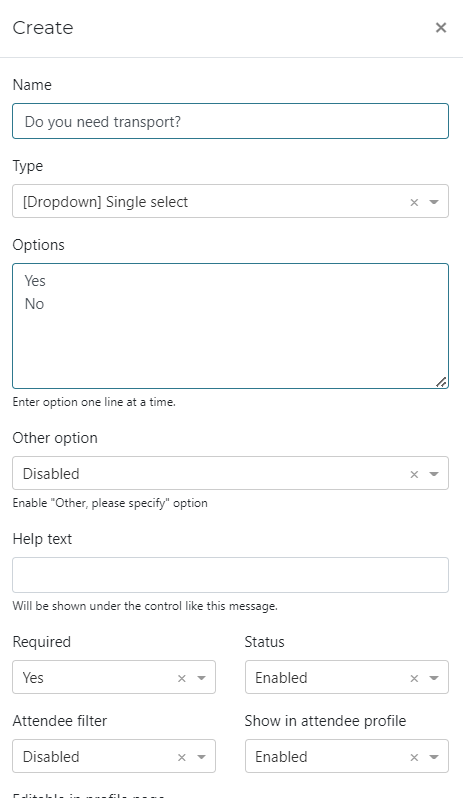
  • Upon selecting create, work your way through each of the options available to you. Start by inputting the name of the attribute i.e. We’d love to send you a welcome T-shirt, please select your T-shirt size. Lastly, select save.
  • Your newly created attribute will appear within the registration page for your attendee’s to respond to accordingly.  

Creating an ‘Other’ option for attendees

#

When creating custom attributes, you might want to enable attendees to input a response or feedback which is different to your pre-set options. An example of this could look like:
‘We’d love to send you a welcome T-shirt, please select your T-shirt size’
An attendee could select from one of the pre-set options:
S
M
L

However, you might want to allow them to input an ‘Other‘ option. 

To create this:

Ensure that Other option is Enabled. 

Other option label: This label signals that there are further options to choose from i.e. ‘Something else’ or ‘Further information’ or ‘Another size’. 

Other option text field label
: Upon selecting the other option label, the input text will clarify the other options field i.e. 
‘Please specify your T-shirt requirements here‘
‘Provide further information about your experiences here’
‘Leave your feedback & any comments here’

Creating branching questions for custom attributes

#

Branching questions can be used to customize the registration process for users and help them bypass irrelevant questions. An example of branching questions could be:

(Question): Do you need to book transport?

If (do you need to book transport?) is Yes

The next questions associated to this answer would be: When you do arrive?

If the answer was no/other, a branching question wouldn’t be required within this workflow & instead the user would move onto the next set of question.

Please follow these rules to set up branching questions:

  • There are two types of attributes required for branching questions:

    Parent attribute: When creating a parent attribute you must ensure that this set as a single drop down. This is to ensure that a single condition answer is set which the child attribute will branch off from.

    Child attribute: This will attach to the parent attribute & will branch off the primary selected (single drop down) response. 

  • Please be advised that branching questions only extend to one level meaning that after the child attribute is answered, branching questions can’t be attached to the child. 
  • Attributes: Where you set up the attributes.
  • Tickets: Where you manage the branching workflow. 

    Please follow these steps to set up the branching attributes workflow: #

  1. To manage the set up of the attributes go into the ‘attributes’ tab & create both the parent & the child attributes. Remember that the parent must be a single select drop down & the child can be set to any, including open text. 
    Also ensure that the status is marked as ‘enabled’ for both. 
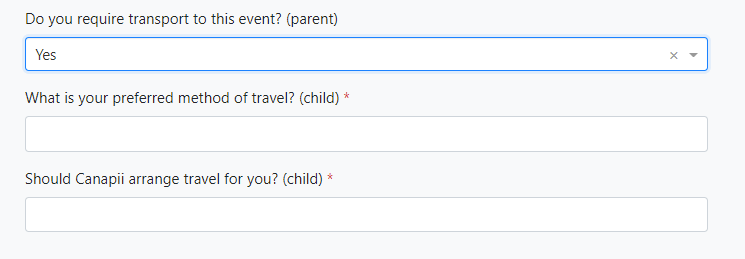
    Please see examples of parent & child attributes below:

    Parent:

Child:

2.  To manage the workflow, now go into the registration ticket where you want the branching workflow to feature.

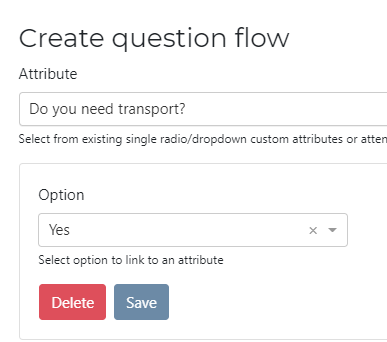
3.  Within the ticket you’ll find a ‘Question flow‘ tab. This is where you manage the branching of questions from parent – child.

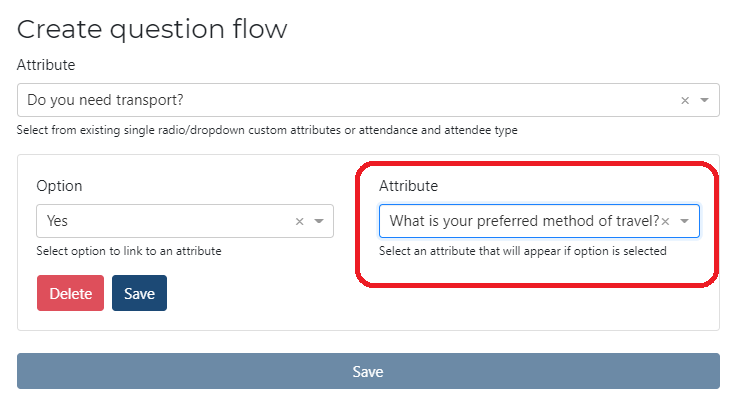
  • Select Add Attribute: Please select the parent attribute.
  • Now select Add rule. Upon adding the rule, select the single drop down answers which will branch onto the child question.


  • Within Attribute, now select the branching child attribute & then select save:

4. Still within the ticket, select the ‘Custom attributes’ tab and ensure that the attributes are also enabled from here. If they aren’t, they won’t be visibly available within the live registration.


You’ve now created your branching questions!

Grouped Attributes

#

To develop this further develop the branching questions you might want to create grouped answers. To achieve this, please follow these rules:

1. As per the above ensure that you’ve created a single parent attribute but instead of creating one child attribute you would set up several of them.

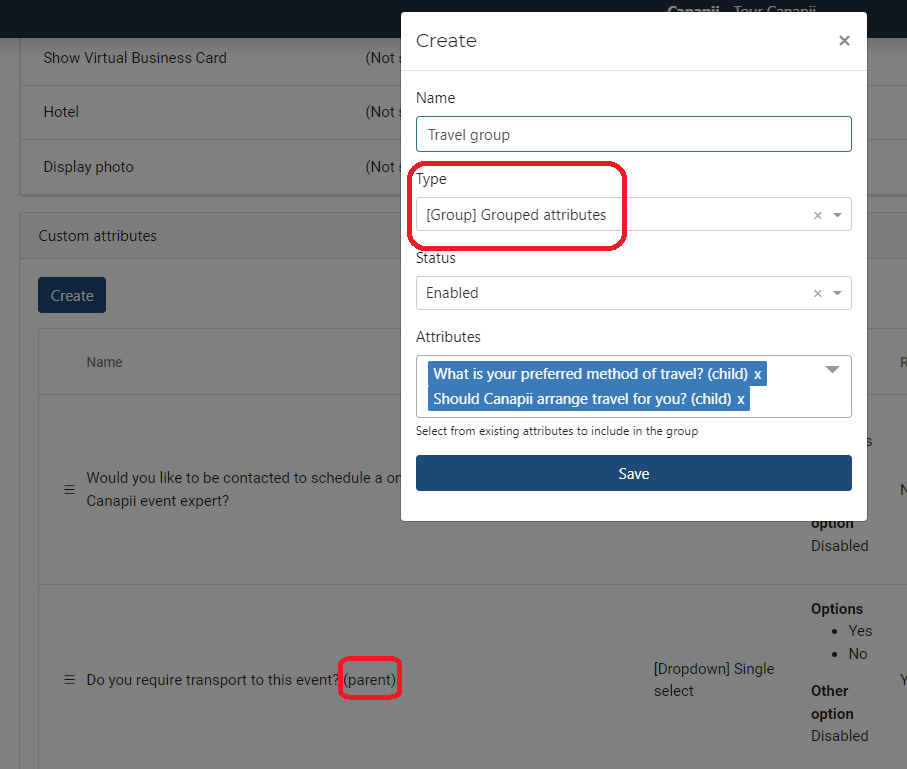
2. Once the attributes have been created, you’ll want to group them so under Type, select Grouped attributes. 

Under Attributes, only pull through the child attributes & save. As per the example below, you will see that the parent attribute hasn’t been selected here. 

3. Now as before:

  • Select the ticket.
  • Select the Question flow tab.
  • Add attribute.
  • Select the parent attribute.
  • Add rule.
  • Select the single select answer which will branch to the child attribute.
  • Now select the grouped attributes (instead of the single child attribute).
  • Select save.
  • Within the ticket, select the Attributes tab and ensure that each are enabled. 

#

4. Within the registration, the grouped attributes will look like this:

  #

Can I change an attendee’s answer (for a custom attribute), after they’ve registered?

#

If you’re required to make amendments to an attendee’s response to a custom attribute, you can do this by searching for their name (within the Attendees tab – Step 1) and clicking in to their profile.

Once within their profile, scroll to the bottom and select Update additional information.

The attribute will pop up on screen & enable you to make the amendment. 

Or

You can enable a setting which allows delegates to update their own responses to a custom attribute.

To achieve this, select update within the attribute that you wish to make accessible.

When you reach Make editable within profile page: select Enable. 

Once enabled, your delegates will find their personal profile within the top right hand corner of an event. Select update profile, scroll to the bottom of the page until they find Additional Information and here they can update their details accordingly. 

Table of Contents
  • Creating an 'Other' option for attendees
  • Creating branching questions for custom attributes
    • Please follow these steps to set up the branching attributes workflow:
    • Grouped Attributes
  •  
  • Can I change an attendee's answer (for a custom attribute), after they've registered?

Share This Article :

  • Facebook
  • X
  • LinkedIn
  • Pinterest

Was it helpful ?

  • Happy
  • Normal
  • Sad
Canapii

The event operations platform for conferences, exhibitions, and hybrid events.

info@canapii.com +44 118 228 1385

Product

  • Event platform
  • Badge printing
  • AI features
  • Integrations

Solutions

  • In-person events
  • Hybrid events
  • Conferences
  • Exhibitions

Resources

  • Blog
  • Case studies
  • Knowledge base
  • Product updates

Company

  • About us
  • Why Canapii
  • Careers
  • Pricing
  • Contact us
© 2026 Canapii. All rights reserved.
Privacy policy Terms & conditions