Canapii Knowledge Base

Getting Started

7
  • How to create an event with Canapii
  • What is the Master Console?
  • Virtual vs In-person event settings
  • Using Google, Facebook, Apple or LinkedIn to access Canapii
  • Why Hybrid? In-person and virtual event management
  • Organizational Analytics
  • Event Mobile App

Design

12
  • General Settings
    • How to Duplicate Events
    • How to Enable Event Features & Networking
    • Menu Bar Customization
    • Reporting Settings
    • How to change an Events Settings
    • Event mode & attendance
    • How to view your event page
    • Branding and customizing your event
    • Banners and page descriptions
  • Microsite
    • Building microsites
  • Welcome Video
    • Adding a welcome video to your event
  • Tabbed Contents
    • Tabbed Contents

People

24
  • Registration
    • Creating custom registration fields
    • Proxy registration
    • Custom welcome emails & registration questions
    • Setting a default language as part of event ticketing
    • Creating event tickets or attendee types first?
    • Sharing ticket links with attendees
    • Invite codes
    • Show personalized data across your event platform
    • Do I need to create both tickets and attendee types?
    • Custom Attributes
    • How to build and edit the registration experience
    • What are tickets and how to create one?
    • How to restrict event tickets to certain emails or domains
  • Attendees
    • Understanding more about attendee activity
    • Where to find registered attendees
    • How to find specific attendees or groups
    • Importing attendees into an event
    • Attendee types
  • RSVP
    • RSVP Management
  • Nominations
    • Using a ‘nominations’ approach for attendee registration
  • Admins
    • Is there an admin limit for events?
    • Adding admins to an event
    • Set as an admin but can’t ‘view’ the event?
    • Managing tech support for your event

Communications

6
  • Campaigns
    • How to verify your email domain or DKIM
    • Importing contacts into the campaign tool
    • How to use the Campaign Tool
  • Message Center
    • Message center
  • Notifications
    • Notifications
  • FAQs
    • Customizing your events FAQ page

Content

44
  • Sessions
    • Moderating the Q&A and Comments tabs during live sessions
    • Making a session private
    • Creating tags and tracks for your sessions
    • Live transcription & closed captions (live breakout sessions)
    • Sessions and How to Create Them
    • Social media sharing for sessions
    • How to identify watched sessions
    • Breakout rooms: How to add, manage, open and close
    • Assigning live breakout roles and explaining the different permissions: Host, Speaker and Viewer
    • Understanding attendee engagement between converted live breakout sessions – VOD sessions
    • How to join a session or meeting in Canapii
    • Preview videos for sessions
    • Highlighting sessions on your event homepage
    • Add downloadable resources & attachments within session page
    • Session reminders
    • Multi-language video options
    • What is Simulive?
    • How to enable share screen permissions on live breakout session when using Mac
    • Ensuring that session speakers are set as ‘session admins’
    • How to add date and time information to session tiles
    • Default, highlight & secondary banners
    • Session announcements
    • How to use Canapii’s video conferencing tool
    • VOD, Live streams, Live-breakouts and Simulive content types
    • Livestreaming
    • What happens when a session page is ‘enabled’?
    • What is the live breakout, whiteboard feature?
    • How to record breakout sessions
    • Guidelines for uploading session tiles
    • Canapii’s greenroom guide
    • ‘Raising hands’ during live breakout sessions
    • What links are supported in the ‘others’ content type?
    • How to upload an On-Demand video
    • Live breakouts – When can speakers and participants join a session?
    • The difference between Canapii conferencing, Zoom and Custom in Live Breakout Sessions
    • Adding a live badge to sessions
    • Understanding how many attendees are viewing live sessions
    • Setting default session settings & editing individual session details
  • Speakers
    • Creating and Managing Speaker Profiles
    • A speakers guide to using Canapii
  • Playlists
    • Creating and Managing Playlists
  • Polls
    • Creating and Managing Polls
  • Abstract
    • Abstract
  • Projects
    • How to Setup Projects

Networking

18
  • Chat
    • How to create a chat group as an organizer
    • Event interactive bar capabilities
    • Homepage chat
    • Utilizing the chat bar during an event
    • What is a chat group?
    • How organizers can contact & network with attendees
  • Meetings
    • Meeting options for attendees
    • How to restrict who can meet with who
    • Audio & visual trouble shooting for meetings
    • Meeting and chat notifications
    • How long are meetings?
    • Matchmaking
    • Understanding pre-defined meeting times
    • How to send out meeting reminders
    • Requesting and managing meetings on Canapii
    • How organizers can edit and view meetings
    • What is a meeting?
    • How to create meeting timeslots within the console

Sponsors

11
  • Creating dedicated sponsor zone representatives
  • Sponsor zone logos, banners and tags
  • What can sponsor admins do on their sponsor page?
  • Understanding the sponsor zone analytics
  • Sponsor zones
  • Building your sponsor zone
  • How to tier event sponsors
  • How to join a session from the Sponsor Zone
  • In-person events: Sponsor leads and Invite codes
  • Adding chat rooms to sponsor zones
  • How to add sponsors to an event

Onsite

11
  • What are Canapii’s in-person capabilities?
  • Badge
    • Badges
  • On-site Control Panel
    • In-person events: QR codes & scanning feature
    • In-person events: Meetings and Sessions
    • On-site Control Panel
  • Fligths
    • Approving and Declining Flights
    • How to manage flight information for in-person events
  • Floorplan
    • Floorplan
  • Hotel
    • How to manage hotels reservations in Canapii
  • Locations
    • In-person Events: Meeting & session locations
  • Venue
    • Venue

Community

4
  • Certification
    • Creating Certification
  • Gallery
    • The Community Gallery
  • Gamification
    • Gamification Setup
    • What is gamification?

Tools

19
  • Domain
    • How to get a custom web domain for an event
  • Integration
    • How does the Social Wall work?
    • Webhooks
    • Slack and Microsoft Teams Integration
    • Stripe
    • Cisco Webex Integration
    • Stripe integration – Test & live keys
    • Green Terp Integration
    • Snapbar & Pixiweb Integration
    • How to integrate Zoom into your platform
    • How to integrate a HyHyve space into your event
    • Interprefy
    • How to integrate Marketo with Canapii
    • Custom registration portal integration
  • Translations
    • Translating an event
    • Translated closed captions
    • Turning on translated closed captions during sessions
    • Translating comments & adjusting time zones
    • How to apply actions to comments & questions

Analytics

2
  • What event analytics are available?
  • Event analytics

Viewing your event

3
  • Event View: How to change Time zone
  • How to see the changes you’ve made to an event
  • Event agenda, my agenda & home agenda

FAQs

16
  • About Canapii
    • Frequently asked questions
    • Canapii’s Terms and Conditions
    • Canapii’s privacy policy
  • Sessions
    • FAQs about sessions
    • Can a live breakout or webinar meeting timeout if nobody joins?
    • Why am I unable to see sessions on the platform homepage?
  • Networking
    • FAQs about networking
  • Sponsors
    • FAQs about sponsors
  • Registration
    • FAQs about registration
  • Other FAQs
    • Can my team receive help emails from our attendees?
    • Canapii Support: Help and FAQ email
  • Pricing
    • Can I run a free trial using Canapii?
    • How should I determine the best package for my event requirements?
    • Is there a minimum term I must commit to for my plan?
    • Is there a limit to the number of events I can run in my plan package?
    • Can I upgrade or cancel my plan at any time?

Troubleshooting

10
  • How to reset your password
  • Trouble receiving verification code
  • Audio and video settings for meetings and live breakout sessions
  • Logging into Canapii without a password
  • Troubleshooting tips for display errors
  • How to adjust video quality
  • “Event not found” message
  • White screens & 404 error messages
  • Trouble receiving MFA sms code
  • Where to find technical support pre, live & post event

Pricing

5
  • Enterprise plan
  • Essential plan
  • Trial plan
  • Training Sessions for non-Enterprise plans
  • Professional plan
View Categories
  • Home
  • Onsite
  • On-site Control Panel
  • On-site Control Panel

On-site Control Panel

Canapii
Updated on March 24, 2026

4 min read

The kiosk functionality is a control panel for on-site attendees and administrators.

The kiosk and control panel are slightly simplified versions of the Console and event dashboard, streamlined for use on site. The kiosk can be pulled up on a tablet or touchscreen and used to quickly register for the event.

On-site Control Panel #

To create your kiosk display, click into the On-site control panel tab under Step 2. If you’re not seeing that tab available, you may need to double-check that your event is not listed as virtual. 

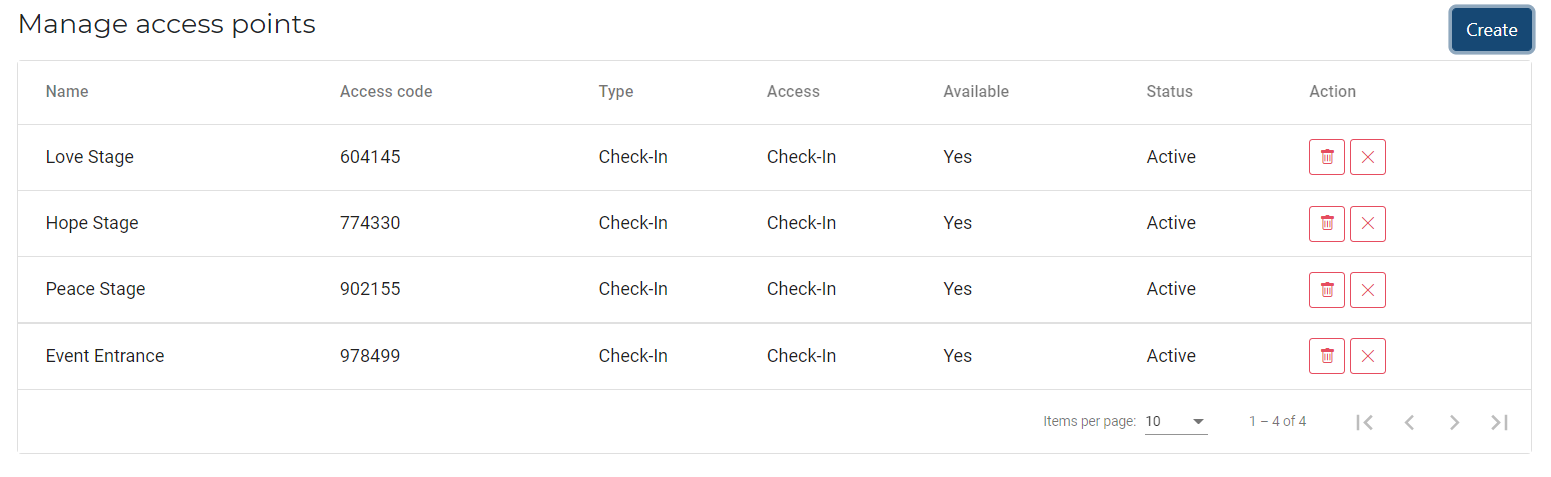
There will be two sections on this page: Manage access points, and Check-in kiosk. The access point section allows you to create the different locations for your kiosk. When you’ve created an access point, a code is automatically generated; when logging into your kiosk, you’ll use this code to match the location to your access point. For example, if you have a registration desk, you can create an access point with that name. You’ll then use the generated access code to log into the Canapii control panel at the registration desk tablet, which will display the check-in screen. 

Click Settings in the Check-in kiosk section to manage your kiosk layout. You can choose a background solid color or image and change the text color; you can also adjust the labels and time clock for the check-in and welcome screens (or disable them entirely). Finally, you can choose whether attendees check-in with their email or with QR, and whether the badge is printed automatically or manually once check-in is completed. 

Tip:

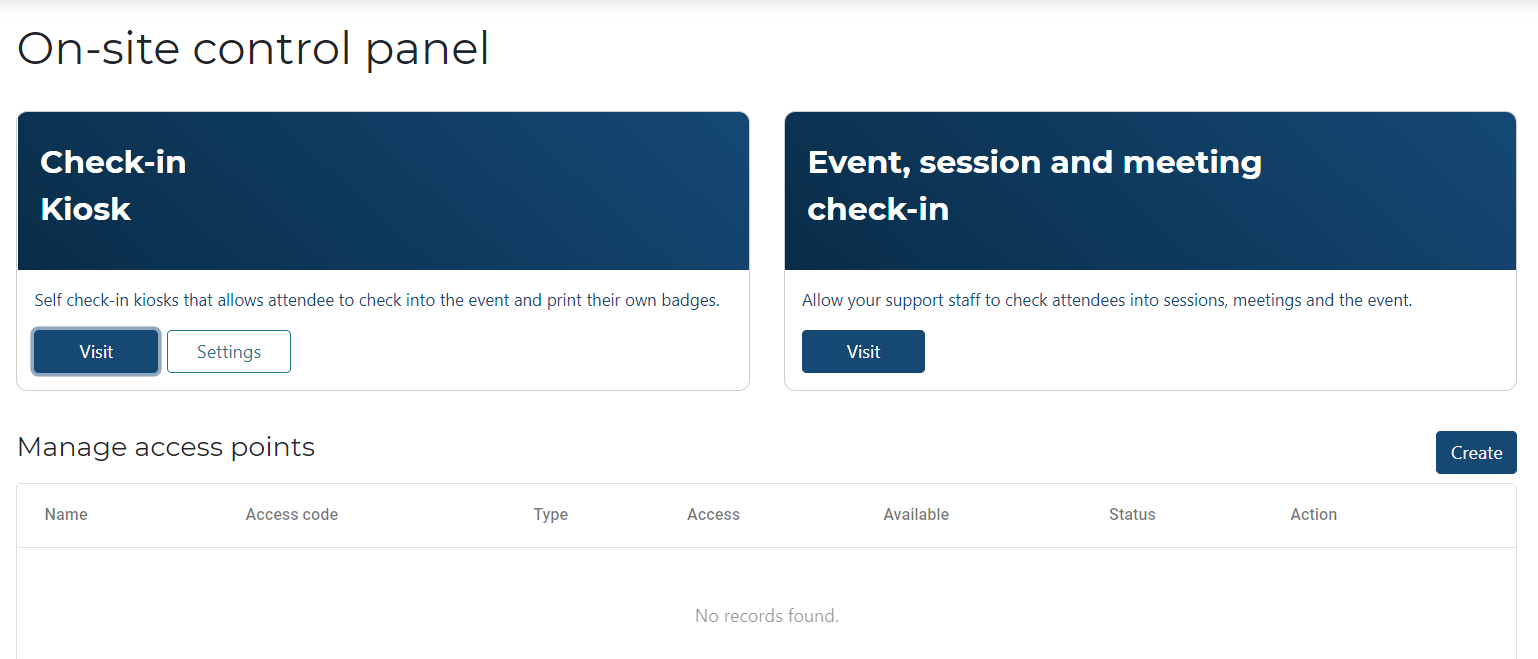
The “Visit” button – click on this button to sign into the kiosk (you’ll do this when you set up your tablet, desktop, or other device on-site). 

Manage Access Points  #

On the same tab, you are able to create and manage access points of your event. Click Create and fill in the necessary details such as Name, Type (check-in or control panel), set Status. 

Note:

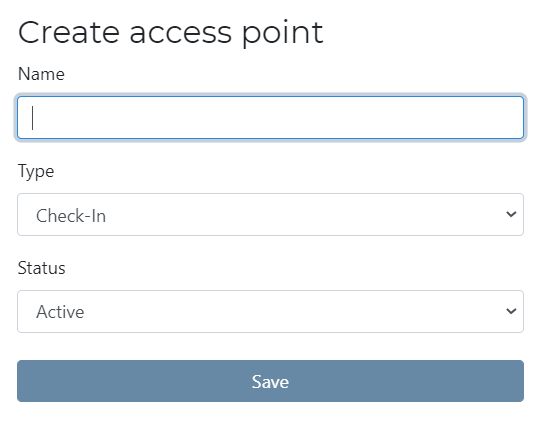
When you create your access point (for example, your registration desk), it will automatically generate an access code. When you click the Visit button, it will open a verification page, where you’ll input that access code. This functions as your login credential for the access point and sign your device into the kiosk that you created. 

#

  #

Note:

Tip: On-site console access points to be updated even when in use. This will remove the need to create new codes if setup incorrectly and allow users to update access as required without having to reenter new code.

Event, session and meeting check-in #

First, create an access point in the “Manage access points” section; as the type, select Console and then check off which check-in you’re using at that location.

Next, in your other device, click Visit in the session and meeting check-in section and use the access code to log in.

Admins will be able to use that access point to check attendees into sessions, public meetings, or the main event, depending on the settings that you chose.

Note:

Tip: Organizers are able to un-check in an attendee if they have been mistakenly checked in. Attendees will then be able to check in again and re-print their badges. 

There is also a Print button beside each entry in the attendee list of the control panel, which your admins can use to print the attendee’s badge.

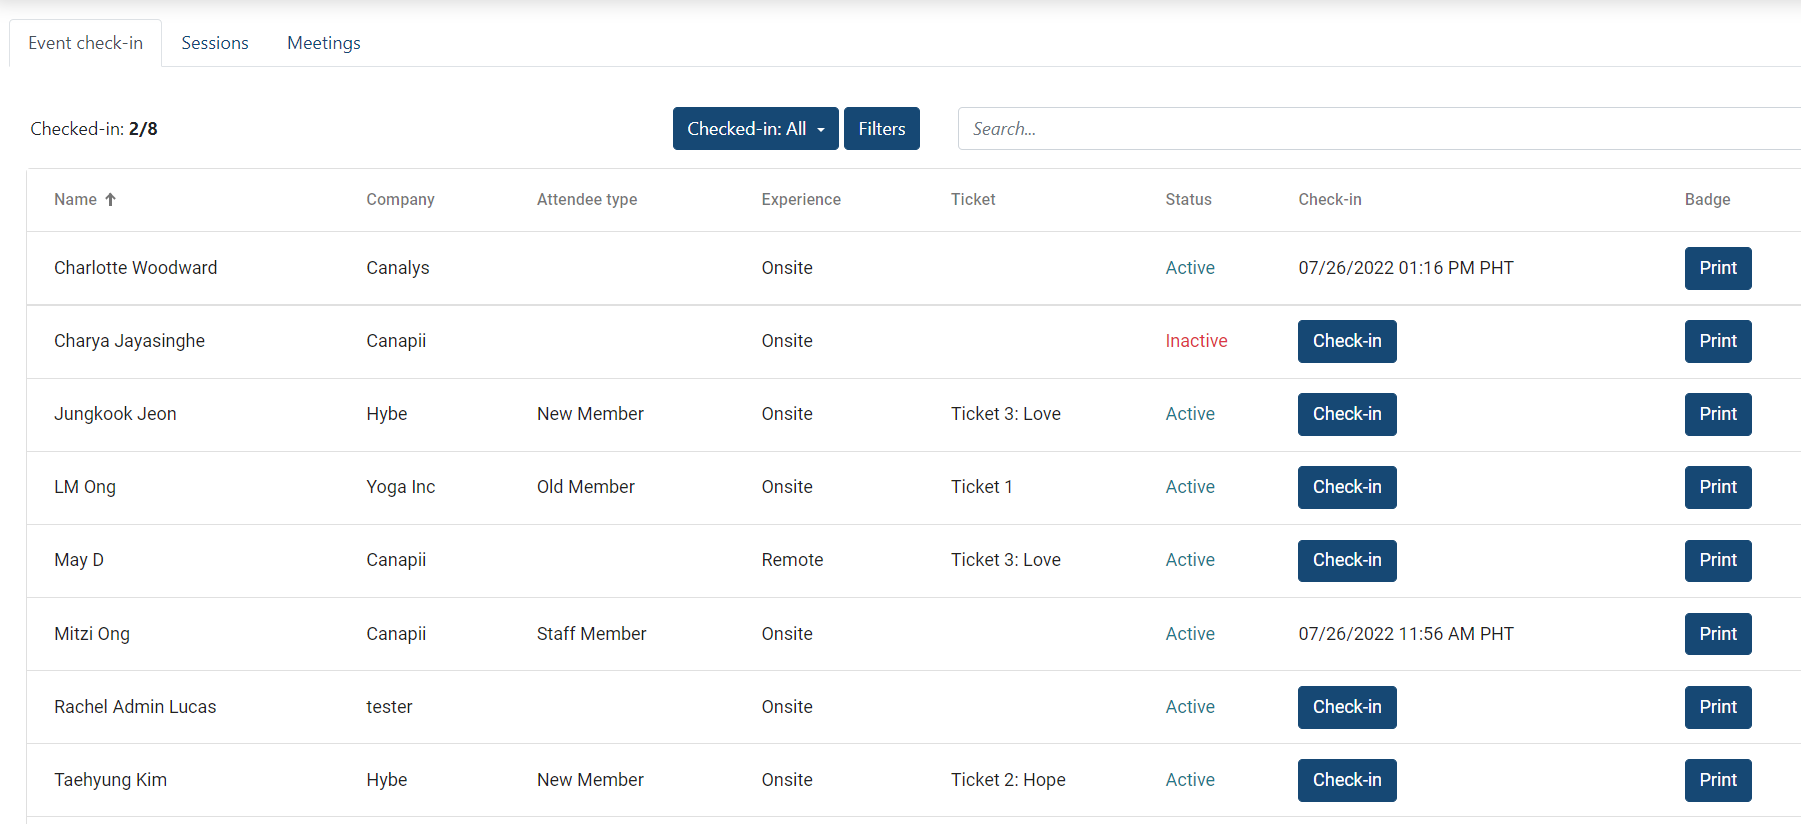
The Search button allows you to search for attendees and its activity across the Event check-in tab, Sessions tab, and Meetings tab.

Push notifications in on-site console  #

Event organizers have the ability to send a push notifications directly to a user through the on-site console.

From the On-site control panel in your console > click Visit (Event, meeting, session check-in > input access code, it will then lead you to your Onsite console. You will see the tabs Sessions, Meetings, and Push notifications.

Under the Meetings tab, select the scheduled meeting then you will see the Send message button where you can send the notification to the attendees of the meeting. 

Under the Push notifications tab, you will see all the notifications the organizer has sent. 

In-person events: Meetings and SessionsIn-person events: QR codes & scanning feature
Table of Contents
  • On-site Control Panel
  • Manage Access Points 
  •  
  • Event, session and meeting check-in
  • Push notifications in on-site console 

Share This Article :

  • Facebook
  • X
  • LinkedIn
  • Pinterest

Was it helpful ?

  • Happy
  • Normal
  • Sad
Canapii

The event operations platform for conferences, exhibitions, and hybrid events.

info@canapii.com +44 118 228 1385

Product

  • Event platform
  • Badge printing
  • AI features
  • Integrations

Solutions

  • In-person events
  • Hybrid events
  • Conferences
  • Exhibitions

Resources

  • Blog
  • Case studies
  • Knowledge base
  • Product updates

Company

  • About us
  • Why Canapii
  • Careers
  • Pricing
  • Contact us
© 2026 Canapii. All rights reserved.
Privacy policy Terms & conditions