Canapii Knowledge Base

Getting Started

7
  • How to create an event with Canapii
  • What is the Master Console?
  • Virtual vs In-person event settings
  • Using Google, Facebook, Apple or LinkedIn to access Canapii
  • Why Hybrid? In-person and virtual event management
  • Organizational Analytics
  • Event Mobile App

Design

12
  • General Settings
    • How to Duplicate Events
    • How to Enable Event Features & Networking
    • Menu Bar Customization
    • Reporting Settings
    • How to change an Events Settings
    • Event mode & attendance
    • How to view your event page
    • Branding and customizing your event
    • Banners and page descriptions
  • Microsite
    • Building microsites
  • Welcome Video
    • Adding a welcome video to your event
  • Tabbed Contents
    • Tabbed Contents

People

24
  • Registration
    • Creating custom registration fields
    • Proxy registration
    • Custom welcome emails & registration questions
    • Setting a default language as part of event ticketing
    • Creating event tickets or attendee types first?
    • Sharing ticket links with attendees
    • Invite codes
    • Show personalized data across your event platform
    • Do I need to create both tickets and attendee types?
    • Custom Attributes
    • How to build and edit the registration experience
    • What are tickets and how to create one?
    • How to restrict event tickets to certain emails or domains
  • Attendees
    • Understanding more about attendee activity
    • Where to find registered attendees
    • How to find specific attendees or groups
    • Importing attendees into an event
    • Attendee types
  • RSVP
    • RSVP Management
  • Nominations
    • Using a ‘nominations’ approach for attendee registration
  • Admins
    • Is there an admin limit for events?
    • Adding admins to an event
    • Set as an admin but can’t ‘view’ the event?
    • Managing tech support for your event

Communications

6
  • Campaigns
    • How to verify your email domain or DKIM
    • Importing contacts into the campaign tool
    • How to use the Campaign Tool
  • Message Center
    • Message center
  • Notifications
    • Notifications
  • FAQs
    • Customizing your events FAQ page

Content

44
  • Sessions
    • Moderating the Q&A and Comments tabs during live sessions
    • Making a session private
    • Creating tags and tracks for your sessions
    • Live transcription & closed captions (live breakout sessions)
    • Sessions and How to Create Them
    • Social media sharing for sessions
    • How to identify watched sessions
    • Breakout rooms: How to add, manage, open and close
    • Assigning live breakout roles and explaining the different permissions: Host, Speaker and Viewer
    • Understanding attendee engagement between converted live breakout sessions – VOD sessions
    • How to join a session or meeting in Canapii
    • Preview videos for sessions
    • Highlighting sessions on your event homepage
    • Add downloadable resources & attachments within session page
    • Session reminders
    • Multi-language video options
    • What is Simulive?
    • How to enable share screen permissions on live breakout session when using Mac
    • Ensuring that session speakers are set as ‘session admins’
    • How to add date and time information to session tiles
    • Default, highlight & secondary banners
    • Session announcements
    • How to use Canapii’s video conferencing tool
    • VOD, Live streams, Live-breakouts and Simulive content types
    • Livestreaming
    • What happens when a session page is ‘enabled’?
    • What is the live breakout, whiteboard feature?
    • How to record breakout sessions
    • Guidelines for uploading session tiles
    • Canapii’s greenroom guide
    • ‘Raising hands’ during live breakout sessions
    • What links are supported in the ‘others’ content type?
    • How to upload an On-Demand video
    • Live breakouts – When can speakers and participants join a session?
    • The difference between Canapii conferencing, Zoom and Custom in Live Breakout Sessions
    • Adding a live badge to sessions
    • Understanding how many attendees are viewing live sessions
    • Setting default session settings & editing individual session details
  • Speakers
    • Creating and Managing Speaker Profiles
    • A speakers guide to using Canapii
  • Playlists
    • Creating and Managing Playlists
  • Polls
    • Creating and Managing Polls
  • Abstract
    • Abstract
  • Projects
    • How to Setup Projects

Networking

18
  • Chat
    • How to create a chat group as an organizer
    • Event interactive bar capabilities
    • Homepage chat
    • Utilizing the chat bar during an event
    • What is a chat group?
    • How organizers can contact & network with attendees
  • Meetings
    • Meeting options for attendees
    • How to restrict who can meet with who
    • Audio & visual trouble shooting for meetings
    • Meeting and chat notifications
    • How long are meetings?
    • Matchmaking
    • Understanding pre-defined meeting times
    • How to send out meeting reminders
    • Requesting and managing meetings on Canapii
    • How organizers can edit and view meetings
    • What is a meeting?
    • How to create meeting timeslots within the console

Sponsors

11
  • Creating dedicated sponsor zone representatives
  • Sponsor zone logos, banners and tags
  • What can sponsor admins do on their sponsor page?
  • Understanding the sponsor zone analytics
  • Sponsor zones
  • Building your sponsor zone
  • How to tier event sponsors
  • How to join a session from the Sponsor Zone
  • In-person events: Sponsor leads and Invite codes
  • Adding chat rooms to sponsor zones
  • How to add sponsors to an event

Onsite

11
  • What are Canapii’s in-person capabilities?
  • Badge
    • Badges
  • On-site Control Panel
    • In-person events: QR codes & scanning feature
    • In-person events: Meetings and Sessions
    • On-site Control Panel
  • Fligths
    • Approving and Declining Flights
    • How to manage flight information for in-person events
  • Floorplan
    • Floorplan
  • Hotel
    • How to manage hotels reservations in Canapii
  • Locations
    • In-person Events: Meeting & session locations
  • Venue
    • Venue

Community

4
  • Certification
    • Creating Certification
  • Gallery
    • The Community Gallery
  • Gamification
    • Gamification Setup
    • What is gamification?

Tools

19
  • Domain
    • How to get a custom web domain for an event
  • Integration
    • How does the Social Wall work?
    • Webhooks
    • Slack and Microsoft Teams Integration
    • Stripe
    • Cisco Webex Integration
    • Stripe integration – Test & live keys
    • Green Terp Integration
    • Snapbar & Pixiweb Integration
    • How to integrate Zoom into your platform
    • How to integrate a HyHyve space into your event
    • Interprefy
    • How to integrate Marketo with Canapii
    • Custom registration portal integration
  • Translations
    • Translating an event
    • Translated closed captions
    • Turning on translated closed captions during sessions
    • Translating comments & adjusting time zones
    • How to apply actions to comments & questions

Analytics

2
  • What event analytics are available?
  • Event analytics

Viewing your event

3
  • Event View: How to change Time zone
  • How to see the changes you’ve made to an event
  • Event agenda, my agenda & home agenda

FAQs

16
  • About Canapii
    • Frequently asked questions
    • Canapii’s Terms and Conditions
    • Canapii’s privacy policy
  • Sessions
    • FAQs about sessions
    • Can a live breakout or webinar meeting timeout if nobody joins?
    • Why am I unable to see sessions on the platform homepage?
  • Networking
    • FAQs about networking
  • Sponsors
    • FAQs about sponsors
  • Registration
    • FAQs about registration
  • Other FAQs
    • Can my team receive help emails from our attendees?
    • Canapii Support: Help and FAQ email
  • Pricing
    • Can I run a free trial using Canapii?
    • How should I determine the best package for my event requirements?
    • Is there a minimum term I must commit to for my plan?
    • Is there a limit to the number of events I can run in my plan package?
    • Can I upgrade or cancel my plan at any time?

Troubleshooting

10
  • How to reset your password
  • Trouble receiving verification code
  • Audio and video settings for meetings and live breakout sessions
  • Logging into Canapii without a password
  • Troubleshooting tips for display errors
  • How to adjust video quality
  • “Event not found” message
  • White screens & 404 error messages
  • Trouble receiving MFA sms code
  • Where to find technical support pre, live & post event

Pricing

5
  • Enterprise plan
  • Essential plan
  • Trial plan
  • Training Sessions for non-Enterprise plans
  • Professional plan
View Categories
  • Home
  • People
  • Show personalized data across your event platform

Show personalized data across your event platform

Canapii
Updated on March 24, 2026

5 min read

Why use this feature? #

First lets explore an example of why this may be useful for your event. Lets say you’d like to have a “My stay” page for your attendees that would list their personalized check in date, check out date, and other hotel information. Whether this information was gathered using the hotel tool during registration or was collected externally, Canapii’s attribute ID feature will do the leg work so you can trust attendees are seeing their unique information.

Before we get into some of the ways you can utilize this functionality for your event, let’s review some key factors about attribute IDs. When using the term “attributes”, we are referring to registration field entries that your attendees input and select during registration. Now you may want to mass import unique data for your attendees that they have not entered during registration. Don’t worry, we will cover how you can do this using our import override feature later in this article.

Managing attributes and their linked attribute id is done via the attributes tab of your event console’s registration page (under step 1 in the left hand sidebar). Once you have navigated to this page you will want to scroll down past the “basic” attributes and locate the Custom attributes section

Custom attributes are a great way to ask tailored questions specific for your event. For example, you can ask registrants what they are most looking forward to or what their top three goals are from attending your event.

How do admins use this feature? #

Now that you’ve had a quick refresher on attributes we can dig into attribute ids and explore how  to show your attendees bespoke information when they view certain pages in the platform.

We should think about attribute ids as a placeholder that tells the platform where to pull the unique information from that is tied to the user who is viewing a page or receiving an email. This is similar to how Mailchimp uses merge tags to insert recipient’s unique personal data in an email using placeholders like [firstname], [lastname], [subscribertype] etc. 

When creating a custom attribute for registration – or as a field for importing attendees – you will want to scroll down to the bottom of the create form and locate the field labeled Attribute id. See the below example:

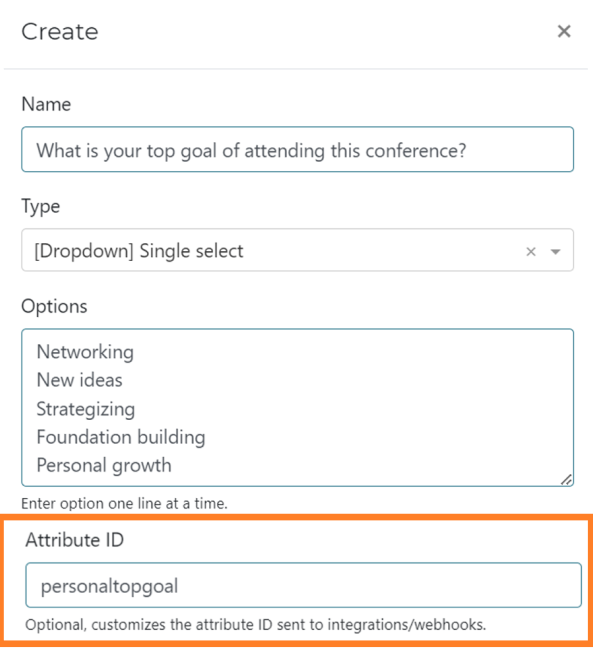
Here I have created a registration question and assigned it the unique attribute id (or placeholder) “personaltopgoal”. Now when a user selects their option for this question, I can show the user their selection elsewhere in the platform. 

You may be wondering where exactly we can use these placeholders in the platform. The following options are currently optimized for use with attribute ID placeholders:

  • Venue (onsite events)
  • Resource center
  • Badges (onsite events)
  • Welcome confirmation emails
  • Campaign tool

Now before you go adding your attribute ids all over the platform, you will need to make a few edits to the tag in order for the system to recognize that it is being asked to pull attendee data in from registration. Simply add “custom.” before your attribute id and encase it in curly brackets “{}”.

Following our example given earlier, if I wanted to pull through a user’s answer to the question “What is your top goal….” I would need to add the following placeholder to my page or welcome email:

{custom.personaltopgoal}

Now with this attribute id placeholder I can use it on the pages and emails listed above to give attendees a personalized experience throughout the event. For example, I can add the “personaltopgoal” attribute ID to the event’s welcome email; if an attendee chose “Personal growth” as the answer to the example Top Goal registration question, their welcome email could read “Thanks for your registration to our event, we’re looking forward to working on personal growth together!” to personalize the message.

What about new attendee information? #

Now, of course regurgitating information that an attendee has already given us isn’t the real goal. In most use cases event admins will want to show attendees new and updated information such as when their transfers will arrive to take them to the airport or what meeting room their session is taking place in. Next we will explore how to import attendees or overwrite existing registrations to include new or updated information. Refer to this article on a simple start guide for importing your attendees if you would like to bypass a ticket based registration path.

Lets look at a use case in which you have your attendees registered using a ticket and in which you’ve made hotel reservations for your guests externally and would like to show your attendee’s their hotel information in one of the pages or emails listed previously. 

Your first step is to create a custom attribute and unique attribute id for each of the fields you would like to show. For instance you may wish to show:

  • hotel check in date
  • hotel check out date
  • hotel name
  • confirmation number

Now that you have created these custom attributes you’ll use the import button on your attendees tab of your event console to import these data points into your registered attendee’s profile. 

Create a simple .csv file that includes the following information: 

  • first name (required)
  • last name (required)
  • email (required)
  • hotel check in date
  • hotel check out date
  • hotel name
  • confirmation number

Note:

NOTES:

  • First name, last name, and email address are required for every import and are used to ensure correct matching when you are overwriting an existing registration. Only the fields you include other than these basic fields will be updated. The other fields in your attendee’s profile will not be changed unless included in this file.
  • Make sure to use the import guide to reference the header names required in your .csv file for the system to import the data into the correct custom attributes that you’ve just created.
Tip:

TIPS:

  • Use the export function to export the existing attendee data into a .csv file and remove all fields or columns you do not wish to update or change. This will give you an easy template to work from when updating the new custom attribute columns that should be now included in your exported csv.
  • If you import a blank cell for a user under your new custom attributes column, the data will not pull through blank but will instead show the placeholder code. To avoid this simply create some default wording and apply to those users who may not have applicable data to input into all columns. Something like “not available” “not required” etc. That way the user will see something other than “{custom.attributeid}” .

Once you have your .csv file created, navigate to the attendees tab, select the the import button then choose file.  Once the file has loaded in the next preview panel, you will see that an error has been thrown: “email already exists”. Simply select the overwrite existing  check box in the lower right of this modal to enable data overwrite.

Note:

if any other error is thrown, it will need to be corrected in your .csv file before you are able to continue.

Once your import is complete and you have placed the appropriate attribute id placeholders on your chosen pages or emails, the system will pull the unique attendee data through according to what was imported for the placeholders. 

Now you have a fully personalized event platform that will show user’s their unique hotel information in platform pages and emails from Canapii.

Table of Contents
  • Why use this feature?
  • How do admins use this feature?
  • What about new attendee information?

Share This Article :

  • Facebook
  • X
  • LinkedIn
  • Pinterest

Was it helpful ?

  • Happy
  • Normal
  • Sad
Canapii

The event operations platform for conferences, exhibitions, and hybrid events.

info@canapii.com +44 118 228 1385

Product

  • Event platform
  • Badge printing
  • AI features
  • Integrations

Solutions

  • In-person events
  • Hybrid events
  • Conferences
  • Exhibitions

Resources

  • Blog
  • Case studies
  • Knowledge base
  • Product updates

Company

  • About us
  • Why Canapii
  • Careers
  • Pricing
  • Contact us
© 2026 Canapii. All rights reserved.
Privacy policy Terms & conditions