Canapii Knowledge Base

Getting Started

7
  • How to create an event with Canapii
  • What is the Master Console?
  • Virtual vs In-person event settings
  • Using Google, Facebook, Apple or LinkedIn to access Canapii
  • Why Hybrid? In-person and virtual event management
  • Organizational Analytics
  • Event Mobile App

Design

12
  • General Settings
    • How to Duplicate Events
    • How to Enable Event Features & Networking
    • Menu Bar Customization
    • Reporting Settings
    • How to change an Events Settings
    • Event mode & attendance
    • How to view your event page
    • Branding and customizing your event
    • Banners and page descriptions
  • Microsite
    • Building microsites
  • Welcome Video
    • Adding a welcome video to your event
  • Tabbed Contents
    • Tabbed Contents

People

24
  • Registration
    • Creating custom registration fields
    • Proxy registration
    • Custom welcome emails & registration questions
    • Setting a default language as part of event ticketing
    • Creating event tickets or attendee types first?
    • Sharing ticket links with attendees
    • Invite codes
    • Show personalized data across your event platform
    • Do I need to create both tickets and attendee types?
    • Custom Attributes
    • How to build and edit the registration experience
    • What are tickets and how to create one?
    • How to restrict event tickets to certain emails or domains
  • Attendees
    • Understanding more about attendee activity
    • Where to find registered attendees
    • How to find specific attendees or groups
    • Importing attendees into an event
    • Attendee types
  • RSVP
    • RSVP Management
  • Nominations
    • Using a ‘nominations’ approach for attendee registration
  • Admins
    • Is there an admin limit for events?
    • Adding admins to an event
    • Set as an admin but can’t ‘view’ the event?
    • Managing tech support for your event

Communications

6
  • Campaigns
    • How to verify your email domain or DKIM
    • Importing contacts into the campaign tool
    • How to use the Campaign Tool
  • Message Center
    • Message center
  • Notifications
    • Notifications
  • FAQs
    • Customizing your events FAQ page

Content

44
  • Sessions
    • Moderating the Q&A and Comments tabs during live sessions
    • Making a session private
    • Creating tags and tracks for your sessions
    • Live transcription & closed captions (live breakout sessions)
    • Sessions and How to Create Them
    • Social media sharing for sessions
    • How to identify watched sessions
    • Breakout rooms: How to add, manage, open and close
    • Assigning live breakout roles and explaining the different permissions: Host, Speaker and Viewer
    • Understanding attendee engagement between converted live breakout sessions – VOD sessions
    • How to join a session or meeting in Canapii
    • Preview videos for sessions
    • Highlighting sessions on your event homepage
    • Add downloadable resources & attachments within session page
    • Session reminders
    • Multi-language video options
    • What is Simulive?
    • How to enable share screen permissions on live breakout session when using Mac
    • Ensuring that session speakers are set as ‘session admins’
    • How to add date and time information to session tiles
    • Default, highlight & secondary banners
    • Session announcements
    • How to use Canapii’s video conferencing tool
    • VOD, Live streams, Live-breakouts and Simulive content types
    • Livestreaming
    • What happens when a session page is ‘enabled’?
    • What is the live breakout, whiteboard feature?
    • How to record breakout sessions
    • Guidelines for uploading session tiles
    • Canapii’s greenroom guide
    • ‘Raising hands’ during live breakout sessions
    • What links are supported in the ‘others’ content type?
    • How to upload an On-Demand video
    • Live breakouts – When can speakers and participants join a session?
    • The difference between Canapii conferencing, Zoom and Custom in Live Breakout Sessions
    • Adding a live badge to sessions
    • Understanding how many attendees are viewing live sessions
    • Setting default session settings & editing individual session details
  • Speakers
    • Creating and Managing Speaker Profiles
    • A speakers guide to using Canapii
  • Playlists
    • Creating and Managing Playlists
  • Polls
    • Creating and Managing Polls
  • Abstract
    • Abstract
  • Projects
    • How to Setup Projects

Networking

18
  • Chat
    • How to create a chat group as an organizer
    • Event interactive bar capabilities
    • Homepage chat
    • Utilizing the chat bar during an event
    • What is a chat group?
    • How organizers can contact & network with attendees
  • Meetings
    • Meeting options for attendees
    • How to restrict who can meet with who
    • Audio & visual trouble shooting for meetings
    • Meeting and chat notifications
    • How long are meetings?
    • Matchmaking
    • Understanding pre-defined meeting times
    • How to send out meeting reminders
    • Requesting and managing meetings on Canapii
    • How organizers can edit and view meetings
    • What is a meeting?
    • How to create meeting timeslots within the console

Sponsors

11
  • Creating dedicated sponsor zone representatives
  • Sponsor zone logos, banners and tags
  • What can sponsor admins do on their sponsor page?
  • Understanding the sponsor zone analytics
  • Sponsor zones
  • Building your sponsor zone
  • How to tier event sponsors
  • How to join a session from the Sponsor Zone
  • In-person events: Sponsor leads and Invite codes
  • Adding chat rooms to sponsor zones
  • How to add sponsors to an event

Onsite

11
  • What are Canapii’s in-person capabilities?
  • Badge
    • Badges
  • On-site Control Panel
    • In-person events: QR codes & scanning feature
    • In-person events: Meetings and Sessions
    • On-site Control Panel
  • Fligths
    • Approving and Declining Flights
    • How to manage flight information for in-person events
  • Floorplan
    • Floorplan
  • Hotel
    • How to manage hotels reservations in Canapii
  • Locations
    • In-person Events: Meeting & session locations
  • Venue
    • Venue

Community

4
  • Certification
    • Creating Certification
  • Gallery
    • The Community Gallery
  • Gamification
    • Gamification Setup
    • What is gamification?

Tools

19
  • Domain
    • How to get a custom web domain for an event
  • Integration
    • How does the Social Wall work?
    • Webhooks
    • Slack and Microsoft Teams Integration
    • Stripe
    • Cisco Webex Integration
    • Stripe integration – Test & live keys
    • Green Terp Integration
    • Snapbar & Pixiweb Integration
    • How to integrate Zoom into your platform
    • How to integrate a HyHyve space into your event
    • Interprefy
    • How to integrate Marketo with Canapii
    • Custom registration portal integration
  • Translations
    • Translating an event
    • Translated closed captions
    • Turning on translated closed captions during sessions
    • Translating comments & adjusting time zones
    • How to apply actions to comments & questions

Analytics

2
  • What event analytics are available?
  • Event analytics

Viewing your event

3
  • Event View: How to change Time zone
  • How to see the changes you’ve made to an event
  • Event agenda, my agenda & home agenda

FAQs

16
  • About Canapii
    • Frequently asked questions
    • Canapii’s Terms and Conditions
    • Canapii’s privacy policy
  • Sessions
    • FAQs about sessions
    • Can a live breakout or webinar meeting timeout if nobody joins?
    • Why am I unable to see sessions on the platform homepage?
  • Networking
    • FAQs about networking
  • Sponsors
    • FAQs about sponsors
  • Registration
    • FAQs about registration
  • Other FAQs
    • Can my team receive help emails from our attendees?
    • Canapii Support: Help and FAQ email
  • Pricing
    • Can I run a free trial using Canapii?
    • How should I determine the best package for my event requirements?
    • Is there a minimum term I must commit to for my plan?
    • Is there a limit to the number of events I can run in my plan package?
    • Can I upgrade or cancel my plan at any time?

Troubleshooting

10
  • How to reset your password
  • Trouble receiving verification code
  • Audio and video settings for meetings and live breakout sessions
  • Logging into Canapii without a password
  • Troubleshooting tips for display errors
  • How to adjust video quality
  • “Event not found” message
  • White screens & 404 error messages
  • Trouble receiving MFA sms code
  • Where to find technical support pre, live & post event

Pricing

5
  • Enterprise plan
  • Essential plan
  • Trial plan
  • Training Sessions for non-Enterprise plans
  • Professional plan
View Categories
  • Home
  • Tools
  • Translated closed captions

Translated closed captions

Canapii
Updated on March 24, 2026

3 min read

Whether you want to use our powerful AI tool to quickly generate closed captions or review and update your session’s closed captions, Canapii’ s transcription tool will help you get the job done! 

Find the list of languages below which can be transcribed and generated to captions, or jump to the step by step instructions here.

Transcribing languages #

Step 1: Canapii will first transcribe the pre-recorded MP4 video (within the assets tab) in US English or one of the following 30 languages:

Arabic (gulf) English  (Scottish) German Japanese Russian
Arabic (modern standard) English  (Welsh) German (Swiss) Korean Spanish
Dutch English (Australian) Hebrew Malay Spanish (US)
English  (British) Farsi Persian Indian Hindi Mandarin Chinese (mainland) Tamil
English  (Indian) French Indonesian Portuguese Telegu
English  (Irish) French Canadian Italian Portuguese (Brazilian) Turkish

Languages available to generate CCs #

Step 2: Using the transcribed video (as per step 1) you can then generate closed captions in one of the 72 languages below:

Afrikaans Estonian Kannada Sinhala
Albanian Farsi (Persian) Kazakh Slovak
Amharic Finnish Korean Slovenian
Arabic French Latvian Somali
Armenian French (Canadian) Lithuanian Spanish (Spain)
Azerbaijani Georgian Macedonian Spanish (Mexico)
Bengali German Malay Swahili
Bosnian Greek Malayalam Swedish
Bulgarian Gujarati Maltese Tagalog
Catalan Haitian Creole Mongolian Tamil
Chinese (simplified) Hausa Norwegian Telugu
Chinese (traditional) Hebrew Persian Thai
Croatian Hindi Pashto Turkish
Czech Hungarian Polish Ukrainian
Danish Icelandic Portuguese Urdu
Dari Indonesian Romanian Uzbek
Dutch Italian Russian Vietnamese
English Japanese Serbian Welsh

How to generate translated Closed Captions for individual sessions #

  • Firstly go into sessions within step 2 of the event console and locate either your VOD or simulive session.
Note:

Closed captions are not available to trial or free plans.

  • Once you’ve selected the session, scroll to the bottom of the session’s settings page until you find the assets tab
    This is where you’re able to upload the MP4 video asset for the session but also where you’re able to transcribe and generate the closed captions
  • Upload the video asset by clicking the gear icon next to the video file option
  • Once the MP4 video has uploaded, locate the transcribe button below. Select this and choose the language that is being spoken within the video

Don’t close the page as this step may take several minutes depending on the size of your file. 

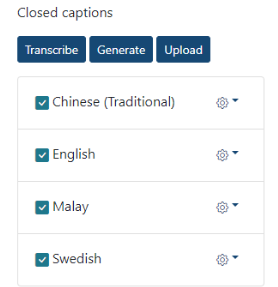
  • Once the file has finished transcribing, you will find the new language option appear below the closed captions section.
Note:

If you would like to edit or review the transcribed closed captions you can do so by selecting the gear icon next to the transcribed language.
The download and upload options enable you to download a copy of the transcription, make edits and re-upload the custom closed captions. Be careful not to edit the time stamps in the transcription file.

Now that the video has transcribed, you can use the transcription to generate, translated closed captions:

  • Select the generate button (this will open a new pop up window)
  • Select the transcription from the select source caption drop down
  • From the caption to generate drop down, select the desired translation (language)
  • Press submit
  • Once the newly generated closed caption language has finished processing, you will see it appear alongside the other language options

Applying Closed Captions to multiple sessions
#

Admins are also able to generate closed captions for multiple sessions, providing that their translation requirements are the same.

You can do this by firstly selecting the source language. As per the above steps, go into each of the individual sessions, scroll to the bottom of the page & select Transcribe. Here you’ll select the source language which the transcriptions will be generated from. Once this initial step is completed, follow the next:

1. Go into Sessions.
2. With the tick boxes, select the multiple sessions which require generated closed captions.
3. Now that you’ve chosen the sessions, click on Actions, from the list find Generate and select accordingly. 
4. Select the already generated Source language i.e. US English & then select the languages which the closed captions should be applied to. Lastly select Save. 
5. To ensure that the closed captions have been applied, go into each session, scroll to the bottom of the page and here you’ll find a list of the generated closed captions:

How do attendees select their desired closed captions within a session? #

Within a video on demand or simulive session (providing that captions have been generated for a session), users will see a small cc option in the lower right corner of the player window. Selecting this will open the full list of closed captions that have been generated.

What about closed captions or transcriptions for livestream and live breakout sessions? #

Typically, closed captions for live streams are fed through the livestream provider. Whether you are using Vimeo or a production company these will be shown in the player window as described above as long as they are included with the feed.

Our integrated video conferencing platform for live breakout sessions and meetings, offer a live transcription option can be enabled from the session’s settings page. At the time of this release the available languages for this type of transcription are:

English (Australian) French German Korean
English (British) French Canadian Portuguese Mandarin Chinese
English (US) Italian Japanese Spanish (Mexico)
Table of Contents
  • Transcribing languages
  • Languages available to generate CCs
  • How to generate translated Closed Captions for individual sessions
  • Applying Closed Captions to multiple sessions
  • How do attendees select their desired closed captions within a session?
  • What about closed captions or transcriptions for livestream and live breakout sessions?

Share This Article :

  • Facebook
  • X
  • LinkedIn
  • Pinterest

Was it helpful ?

  • Happy
  • Normal
  • Sad
Canapii

The event operations platform for conferences, exhibitions, and hybrid events.

info@canapii.com +44 118 228 1385

Product

  • Event platform
  • Badge printing
  • AI features
  • Integrations

Solutions

  • In-person events
  • Hybrid events
  • Conferences
  • Exhibitions

Resources

  • Blog
  • Case studies
  • Knowledge base
  • Product updates

Company

  • About us
  • Why Canapii
  • Careers
  • Pricing
  • Contact us
© 2026 Canapii. All rights reserved.
Privacy policy Terms & conditions